The Perfect Tart Crust Recipe


If you’re just getting into baking, or you’re looking to switch things up with your tart crusts, you need to check out this recipe! Personally, it’s my tart crust recipe of choice when I’m making my famous custard apple tart (recipe coming soon), but the walnuts are an excellent complement to so many yummy treats!

This simple, tart crust is easy to prepare, and helps pack a powerful punch of walnut flavor into every dish. One of my favorite parts? You can also sub in for this fun, delicious crust for recipes that call for a blind baked (i.e. cooked separately) crust!
It’s an extra added step for most recipes, and as a busy mom myself, I know all too well that sometimes we just don’t have the energy at the end of the day. But believe me, if you’re feeling up to it, going that extra mile is well worth the effort! This walnut tart crust will help elevate every dish!
🥘 Ingredients

- All-Purpose Flour
- Salt
- Butter (unsalted)
- Walnuts – grated
- Egg Yolks
- Water
See the recipe card for quantities.
🔪 Instructions
First, you’ll want to start out by running your flour and sugar icing through a sieve in a big mixing bowl.
Make a hole in the center (somewhat resembling a volcano) and add your salt. You’re also going to cut your chilled, unsalted butter in small cubes, and throw them in the center, too.
From there, start working the flour into the cold butter by squeezing it in with your fingers. You’ll be squeezing cube by cube, so this process will take some time, but we need to get the butter mixed with the flour before the butter starts to melt.
Once the flour and the butter are fully worked together, we should end up with crumbs that resemble breadcrumbs, and they should stick together when compressed.
From here, you’ll need to make another hole in the center of the flour mixture. You’ll be adding in your egg yolks, walnuts and water.
Start gently working everything together into a dough. It’s really important during this step that you don’t overwork the dough, since that can cause it to crack when baked.

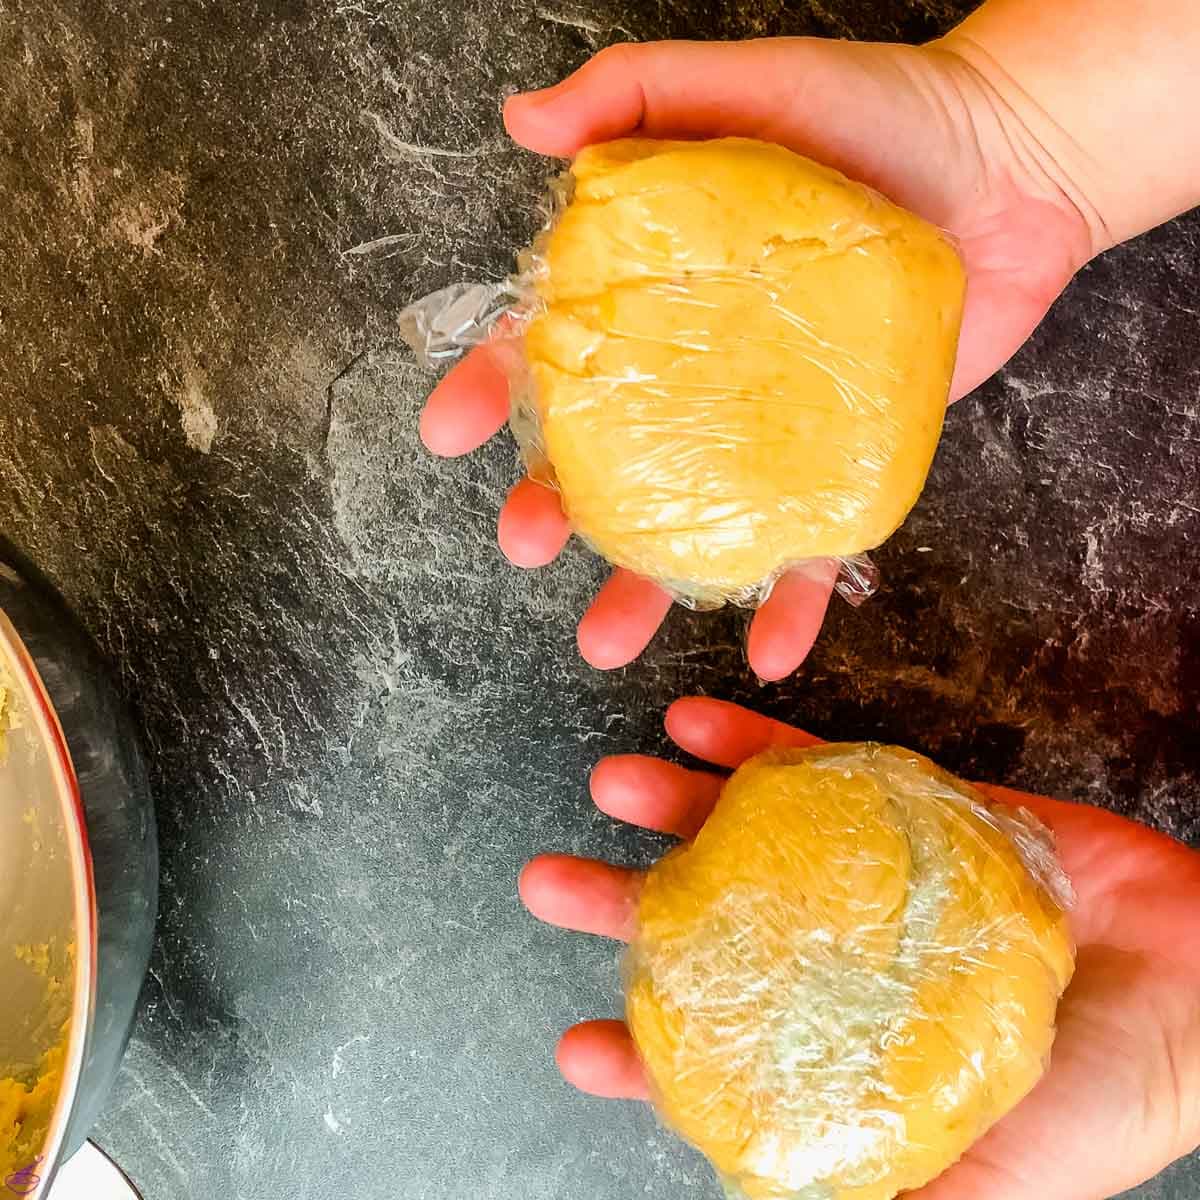
Once all those ingredients are nicely work together, cut the dough into two even balls. Wrap both of them in cling film and let them rest in a fridge for about an hour.
After the dough has chilled, put each ball between two sheets of baking paper. Get out your rolling pin and roll them to about 3-4mm / 0.1 inch thickness. You’re going to use one for the base, so if you come across any cracks while rolling it out evenly, be sure to press it a bit so the cracks are covered. Next, cut the tart dough with a cake pan ring, and place it on the cake pan base.


You’re going to use the second ball of tart dough to make a longer oval shaped form with same thickness, and cut it about 4cm / 1.5 inch wide – or according to the height of your cake pan. Use the tart dough to make the cake wall and press it on the bottom so it connects with the base all around.
Remove any excess dough with a sharp knife and poke the base with a toothpick or a fork. You’ll be able to freeze the extra dough and use it for the next time!
Now, you can fill the crust with the filling of your choice and bake it.
You can also use this recipe for a pre-baked tart base, though! Follow the instructions below if you plan to use a tart filling that isn’t baked with the crust!

Once you’ve put aside your excess dough covered the cake pan with dough — the base and the sidewalls — you’ll need to place the formed dough in the fridge for about 30 minutes, so it’s properly chilled. While it’s chilling, go ahead and preheat your oven to 180 °C / 360 °F.
You’ll only need to bake your chilled crust for 15 minutes. To make sure the crust stays flat before baking, you can cover it with parchment paper or aluminum foil and then put rice over it (filling 2.5 cm / 1 inch) to help weigh it down evenly. Just be sure to remove the rice before placing it in your preheated oven! This step is optional, but it is suggested. Once you finish baking your tart crust, let it cool down to room temperature.
After it’s cooled down, your baked tart base is ready to be filled with the ganache of your choice!
All that’s left to do is put on the final decorative touches and serve!
🍑 Variations
This recipe can all be prepared in a springform or a tart pan.
It can also be used for tart recipes where the crust must be blind baked. The term “Blind Baking” means baking the crust fully by itself before adding in any fillings.
🍽 Equipment
- 9 inch (23 cm) Tart Pan / Cake Pan
- Rubber Spatula
- Rolling Pin
- Hand mixer
- Whisk
- Mixing Bowls
- Parchment Paper
- Oven
🌡 Storage & Top tips
If you’re left over with any excess dough, you can keep it in the fridge for up to three days. If you don’t have any baking plans on the immediate horizon, though, you can store the tart dough in the freezer for as long as three months.
If you’re blind baking your pie crust ahead of time, don’t go more than three days in advance! Be sure to wrap it tightly in Saran Wrap or place it in an airtight container before throwing it in your fridge. Another really important tip: Don’t combine your pie crust and filling until the day you plan to serve it!
Although there’s some leeway, depending on what kind of tart you’ll be enjoying, as a general rule of thumb, plan to eat your leftover tart within three days. And be sure to keep those tart leftovers in an airtight container!
You will be left with some egg whites in this recipe. You can either freeze them in ice cube trays to have on hand for a later time or to continue processing them with the following recipes:
🙋🏻 FAQ
One of the main differences between a pie crust and a tart crust is the thickness of the crust! Tarts usually have a thicker crust, and unlike pies that are also covered in crust, tarts only have a bottom crust.
There’s plenty of variations when it comes to tart crust — like adding in shaved walnut for example — but the main ingredients you’ll find in a basic tart crust are flower, sugar, salt, butter, and usually, a little bit of vanilla extract!
You might causally refer to both as pie crusts, but tart crust and puff pastry crust are made with two completely different kinds of dough! Unlike our recipe for tart crust, a puff pastry dough is made using only flour, water, and fat. And whereas our tart crust is rolled on a little thick, puff pastry needs to be rolled out into thin sheets. It’s also typically used for more savory treats than sweet.
Technically, yes, if your recipe calls for tart crust, but you have a pre-made pie crust from the supermarket that’s calling your name, the recipe should still work. If the tart crust in question is helping to add some additional flavor into the dish, though, like walnut, for example, you’re better off sticking with the tart crust!

now available!
My new workbook is here!
Brewing Coffee for Milk Drinks
How to adapt your favorite brews for milk & creamers — without an espresso machine!
If you make this recipe, let me know how you liked it by ★★★★★ star rating it and leaving a comment below. This would be awesome! You can also sign up for our Newsletter or follow me on Pinterest or Instagram and share your creation with me. Just tag me @combinegoodflavors and hashtag #combinegoodflavors, so I don’t miss it.
Tart Crust with Walnuts

Equipment
- Tart Pan / Cake Pan 9 inch / 23 cm
- Rolling Pin
- Wisk
- Oven
Ingredients
- 3 cups All-Purpose flour sieved
- ¼ cup Icing sugar
- 1 tsp Salt
- 1 cup Butter unsalted
- ¼ cup Walnuts
- 4 Egg Yolks
- ½ cup Water
Instructions
- Sieve 3 cups All-Purpose flour and ¼ cup Icing sugar through a sieve, and make sure they are not clanged together.3 cups All-Purpose flour, ¼ cup Icing sugar
- Make a hole in the center (somewhat resembling a volcano) and add 1 tsp Salt.1 tsp Salt
- Cut 1 cup Butter in small cubes, and throw them in the center, as well.1 cup Butter
- Start working the flour into the cold butter by squeezing it in with your fingers. You'll be squeezing cube by cube, so this process will take some time, but we need to get the butter mixed with the flour before the butter starts to melt.
- Make another hole in the center of the flour mixture. Add 4 Egg Yolks, ¼ cup Walnuts and ½ cup Water.¼ cup Walnuts, 4 Egg Yolks, ½ cup Water
- Start working everything together into a dough. You can use a kitchen machine for this step.
- Cut the dough into two even balls. Wrap both of them in cling film and let them rest in a fridge for about an hour.
- After the dough has chilled, put each ball between two sheets of baking paper. Get out your rolling pin and roll them to about 3-4mm / 0.1 inch thickness.
- Cut the tart dough with a cake pan ring, and place it on the cake pan base.
- You're going to use the second ball of tart dough to make a longer oval shaped form with same thickness, and cut it about 4cm / 1.5 inch wide – or according to the height of your cake pan. Use the tart dough to make the cake wall and press it on the bottom so it connects with the base all around.
- Remove any excess dough with a sharp knife and poke the base with a toothpick or a fork. You'll be able to freeze the extra dough and use it for the next time!
- Now, you can fill the crust with the filling of your choice and bake it according to the desired recipe.
Pre Bake Crust
- Once you've put aside your excess dough covered the cake pan with dough — the base and the sidewalls — you'll need to place the formed dough in the fridge for about 30 minutes so it's properly chilled.
- While it's chilling, go ahead and preheat your oven to 180 C / 360 F.
- To make sure the crust stays flat before baking, you can cover it with parchment paper or aluminum foil and then put rice over it (filling 2.5 cm / 1 inch) to help weigh it down evenly.
- You'll only need to bake your chilled crust for 15 minutes.
- After it's cooled down, your baked tart base is ready to be filled with the ganache of your choice!
- All that's left to do is put on the final decorative touches and serve!
Nutrition
🤎 You might also like
⛑️ Food Safety
- Wash hands, utensils, and work surfaces before preparing food or drinks.
- Use clean glasses, jars, cutting boards, and utensils.
- Keep raw eggs, raw flour, and unbaked dough or batter away from ready-to-eat foods.
- Do not eat raw dough or batter that contains raw flour or raw eggs.
- Keep perishable ingredients chilled until ready to use.
- Do not leave perishable foods or drinks at room temperature for more than 2 hours, or 1 hour if the temperature is above 90 °F / 32 °C.
- Refrigerate leftovers and perishable items promptly in airtight containers.
For further information, check Safe Food Handling – FDA.
Love the addition of the walnuts. Adds a nice texture and stability to the crust. Perfect with Meyer lemon curd filling.
i love your tart crust recipe – it is so buttery and flaky. just perfect.
I made a tart crust once and had to do it three times before getting it right. Your recipe was so much easier to follow. Thanks.