Delicious homemade mini cheeseburger Recipe


Mini cheeseburgers are something I’ve always wanted to include in a Christmas menu. In 2020, the time had come for an American-inspired Christmas dinner. Yey!

The planned Christmas dinner included the following courses:
- Appetizer – Caesar salad with homemade dressing
- Soup – Corn soup
- Main course – Homemade mini cheeseburgers
- Dessert – Waffle blossom with chestnut pureé
Get the free recipe collection “American-inspired Christmas dinner,” including the recipes above.
But while planning, I already faced a problem: “How do you prepare fluffy burger buns that have that unmistakable flavor?” After a little research, I found some recipes that fell on the shortlist and, without further ado, set out to try them out. Unfortunately, some of the recipes didn’t pass the test, as neither the consistency nor the taste was what I was looking for.
But then I found the perfect one! They are super fluffy and have an incredible taste! On that note, I’d like to link here to the recipe’s creator Ursula from “tasteoftravel“, and say thank you! 💚 Her recipe is just what you need for perfect buns. I did adapt it a bit to our needs, but the bottom line is that the basics are the same.
🥘 Ingredients – buns
Pre-dough (Poolish, Tangzhong)
- 1.52 fl oz (45 ml) water
- 1.52 fl oz (45 ml) milk
- 0.56oz (16 g) flour
Thanks to the pre-dough (poolish, Tangzhong), the buns are getting super fluffy!
Main-dough
- 3.7 fl oz (110 ml) warm milk
- 0.17 oz (5 g) dry yeast
- 1 Egg (M)
- 1.94 oz (55 g) melted butter
- 0.88 oz (25 g) crystal sugar
- 0.2 oz (6 g) salt
- 10.58 oz (300 g) wheat flour (farina)
For coating
- 1 egg yolk
- 1 teaspoon milk
- Oil (for the mixing bowl)
🍽 Equipment
- Kitchen machine
- 2 small cooking pot
- 1 small pan
- 1 big mixing bowl with lid
- 2-3 mixing bowls
- 1 whisk (eggbeater)
- 1 wooden spoon
- 1 baking brush
- Baking paper
- Baking tray
🔪 Instructions – buns
Prepare the pre-dough
The pre-dough can be made in no time at all. A stroke of luck! I thought that would be a lot of hassle! 😀 First, whisk together water and flour in a small cooking pot until smooth. Once this is done, pour in milk while stirring. To make a wonderful pre-dough from it, gently heat the mixture on the stove while stirring.
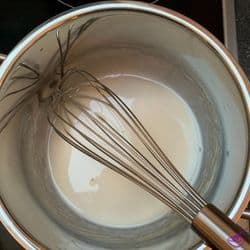
Here it is very, very important that you do not bring the pre-dough to a boil. Aim for a temperature of about 149 °F / 65 °C here.
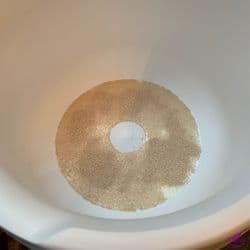
Under constant stirring, the mixture changes to a pudding-like consistency. And this is precisely what you want. Once the pre-dough has this dense texture, it is ready, and you can remove it from the stove. Put the pre-dough aside and let it cool down.
Prepare the main-dough
Pre-heat the milk in a small pot and melt the butter in a small pan. It would be best if you did this already while preparing the pre-dough, so you’ll save yourself some time. Now pour the heated milk into a mixing bowl and sprinkle the dry yeast evenly over it. Then wait a minute.
Now add an egg and whisk it with an egg beater. The next step is to stir in the lukewarm pre-dough and melted butter with a wooden spoon or tablespoon.
If you want to use a kitchen machine, this is where it comes into play.
Pour the milk, yeast, egg, pre-dough, and butter mixture into the kitchen machine bowl. Now add the sugar, salt, and half of the flour and mix it with the wooden spoon until the ingredients are well combined. Then let your kitchen machine (use dough hook) get to work. Add the rest of the flour as it kneads and let the device combine it into a dough.
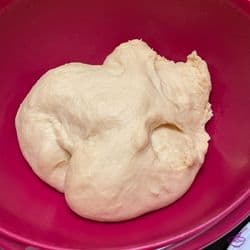
Of course, you can do all of this with a wooden spoon and knead it yourself with your hands. The dough is ready as soon as it separates from the bowl’s surface (about 5 minutes).
Now you need a clean bowl with a lid. Coat it with a teaspoon of oil and pour the dough into it. Cover the bowl with the lid (or cling film, if you don’t have a bowl with a lid). Now the dough has time to rest for an hour at room temperature to double its volume.
Finally, you have a break. Have a coffee or tea until you can continue. 😉 What, already one hour? Okay, now it’s time to continue with the delicious buns. Sprinkle a suitable work surface with a little flour and knead the dough there briefly to let the air out.
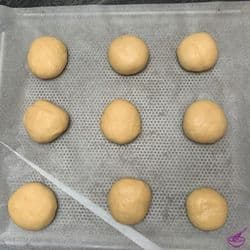
Divide the dough into equal-sized pieces. For the miniature form, that’s about nine pieces of dough. I can also only recommend weighing the dough pieces with the kitchen scale. You don’t want a family member being disappointed later on with getting a tinier bun.
There is also a unique rolling technique for the buns here. The first time I rolled the buns after dividing them by hand without bothering with the special rolling technique—the second time than with the suggested instructions. I honestly didn’t notice much difference. But if you’re interested in seeing exactly how it works, you can check it out here.
Now place the finished rolled buns on a baking sheet lined with baking paper. Let them rise at room temperature for another 30 minutes until they have significantly increased in volume.
Now pre-heat the oven to 320 °F / 160 °C (circulating air) while whisking one egg yolk and one teaspoon of milk. Brush the buns with the egg-milk mixture and bake for 10-15 minutes until golden brown.
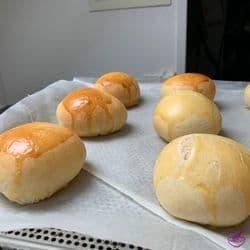
Let the buns cool after baking and store them in a bread tin until the next day.
Perfect! The buns are ready prepared. You’ll continue on the next day just before serving the Christmas menu. Since you still need patties and the remaining ingredients for your mini cheeseburgers.

🥘 Ingredients – patties
- 21.16 oz (600 g) minced meat from beef (better a little greasier than too lean)
- Half an onion (finely diced)
- 2 tsp salt
- 1 tsp grounded pepper
- 2.11 oz (60 g) sliced Cheddar
- 10 leaves iceberg lettuce
- Ketchup
- BBQ Sauce
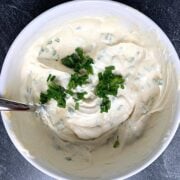
- Sourcream Sauce
🍽 Equipment – patties
- 1 big mixing bowl
- 1-2 chopping boards
- 2 big skillets
- 1-2 sandwich paper sheets
- 1 spatula
- 1 spreading knife
- 8 Toothpicks
- 2 plates
🔪 Instructions – patties
Shortly before grilling the patties, gently mix the minced meat with the finely diced onions, salt, and pepper. Please do not use a burger press. The looser, the better.
Cut out 16 squares of the same size from the sheets of sandwich paper. They should be about the size of the buns after you have not yet formed the patties.
Cut out 16 squares of the same size from the sandwich paper sheets. They should be about the size of the buns. Now distribute eight of the squares on one or two cutting boards.
Divide the minced meat into eight equal portions and place those piles of meat on the sandwich paper squares.
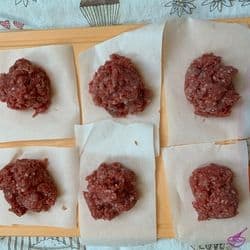
Now cover the mince heaps with the remaining eight squares and press them lightly (with a plate or a spoon). They should be about the thickness of your thumb and not exceed the diameter of the buns.
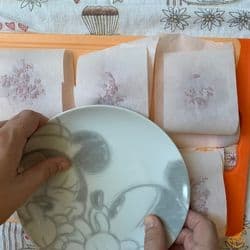
If you think the patties’ edges are too loose, squeeze them a little, so they keep their shape and don’t fall apart. Before you start frying, prepare the cheddar as well as the lettuce.
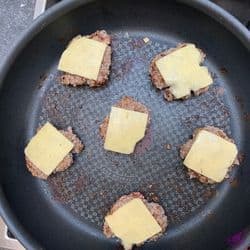
Cut the cheddar slices into 16 equal squares and set them aside. Wash the iceberg lettuce, pat dry, and set aside. Now preheat the pans (medium-high heat) and put the prepared patties (without the sandwich paper, of course) 😀 into the pan.
Don’t use oil if the meat is greasy enough! If you like your patties medium, fry them for about 2-3 minutes on each side.
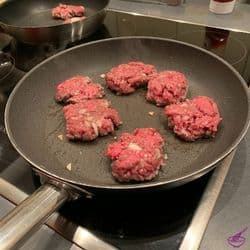
After flipping the patties for the first time, place two cheddar cheese squares on each patty so they can melt while frying.
Once the patties are grilled medium, remove them from the pan and let them rest for a few minutes on two plates. Meanwhile, cut the buns in half and toast them briefly on the grill. Coat the insides of the buns with ketchup. Place the lettuce on top. Follow with your great patty, and now place on top the top part of the bun.
Secure the Mini Cheeseburger with a toothpick and arrange them on a plate. Now your homemade mini cheeseburgers are all ready to be served.
Since people have different tastes, we have placed various sauces on the dining table so that your guests can serve themselves according to their liking.
To avoid unnecessary stress during the mini cheeseburgers’ preparation, I recommend working together with your friend/partner or a family member. In our case, my husband has taken care of the preparation and grilling of the patties (he is the grill master at home). 😀
I have taken over the preparations of the buns and their ingredients. Thus, the cooking doesn’t take too long, and nothing got cold.
🤎 You might also like
The utterly perfect mini cheeseburgers

Equipment
- 2 Pans
- 1 whisk (eggbeater)
Ingredients
Pre-dough ingredients
- 45 ml Water
- 45 ml Milk
- 16 g Flour
Main-dough ingredients
- 110 ml Warm milk
- 5 g Dry yeast
- 1 medium sized Egg
- 55 g Melted butter
- 25 g Crystal Sugar
- 6 g Salt
- 300 g Wheat Flour (farina)
For coating
- 1 Egg yolk
- 1 teaspoon Milk
- Oil (for the mixing bowl)
- Flour (for the work surface)
Ingredients for the patties
- 600 g Minced meat from beef (better a little greasier than too lean)
- ½ Onion
- 2 teaspoons Salt
- 1 teaspoon Grounded pepper
- 60 g Sliced Cheddar
- 10 leaves Iceberg lettuce
- Ketchup
For dipping at the dinner table
- BBQ Sauce
- Sourcream Sauce
- Ketchup
Instructions
Prepare the pre-dough
- Whisk together water and flour in a small cooking pot until smooth.
- Pour in milk while stirring.
- Heat the mixture gently (about 149 °F / 65 °C) on the stove while stirring until it gets a pudding-like consistency.
- Set aside and let it cool down.
Prepare the main-dough
- Preheat the milk in a small pot and melt the butter in a small pan.
- Pour the heated milk into a mixing bowl and sprinkle the dry yeast evenly over it. Wait 1 minute.
- Add an egg and whisk it.
- Stir in the lukewarm pre-dough and melted butter with a wooden spoon.
- Pour the milk, yeast, egg, pre-dough, and butter mixture into the kitchen machine bowl.
- Add sugar, salt, and half of the flour and mix it with a wooden spoon until the ingredients are well combined.
- Then let your kitchen machine (use a dough hook) get to work.
- Add the rest of the flour as it kneads and let the device combine it into a dough.
- The dough is ready as soon as it separates from the bowls surface (approx. 5 minutes).
- Take a clean bowl with a lid and coat it with a teaspoon of oil. Pour the dough into the bowl and close the lid.
- Now the dough has time to rest for an hour at room temperature to double its volume.
- Sprinkle a suitable work surface with a little flour and knead the dough there briefly to let the air out.
- Divide the dough into 9 equal-sized pieces and form 9 little buns.
- Place the buns on a baking sheet lined with baking paper.
- Let them rise at room temperature for another 30 minutes until they have significantly increased in volume.
- Now preheat the oven to 320 °F / 160 °C (circulating air) while whisking one egg yolk and one teaspoon of milk.
- Brush the buns with the egg-milk mixture.
- Bake for 10-15 minutes until golden brown.
- Let the buns cool after baking.
Burger Patties Preparations
- Shortly before grilling the patties, gently mix the minced meat with the finely diced onions, salt, and pepper.
- Cut out 16 squares (about the size of the buns) from the sheets of sandwich paper and distribute eight of them on 1-2 cutting boards.
- Divide the mince into eight equal portions and place those piles of meat on the sandwich paper squares.
- Cover the mince heaps with the remaining eight squares and press them lightly (with a plate or a spoon). They should have the thickness of your thumb.
- Cut the cheddar slices into 16 equal squares and set them aside.
- Wash the iceberg lettuce, pat dry, and set aside.
- Now preheat the pans (medium-high heat) and put the prepared patties into the pan. (don't use oil if the meat is greasy enough!)
- Fry them for 2-3 minutes on each side.
- After flipping the patties for the first time, place two cheddar cheese squares on each patty so they can melt while frying.
- Once the patties are grilled medium, remove them from the pan and let them rest for a few minutes on two plates.
- Meanwhile, cut the buns in half and toast them briefly.
- Coat the insides of the buns with ketchup. Place the lettuce on top. Add the patty and the top part of the bun.
- Secure the mini cheeseburger with a toothpick and arrange them on a plate.
For dipping at the dinner table
- Place various sauces on the dining table, so your guests can serve themselves according to their liking.
Nutrition
⛑️ Food Safety
- Wash hands, utensils, and work surfaces before preparing food or drinks.
- Use clean glasses, jars, cutting boards, and utensils.
- Keep raw eggs, raw flour, and unbaked dough or batter away from ready-to-eat foods.
- Do not eat raw dough or batter that contains raw flour or raw eggs.
- Keep perishable ingredients chilled until ready to use.
- Do not leave perishable foods or drinks at room temperature for more than 2 hours, or 1 hour if the temperature is above 90 °F / 32 °C.
- Refrigerate leftovers and perishable items promptly in airtight containers.
For further information, check Safe Food Handling – FDA.


Mini burgers make great appetizers. The perfect size for little hands too. What a fun burger recipe.
These look so yummy! Because they are mini, I could definitely have more than one and not feel guilty 😅🤣
Love that this includes full recipes for both the buns and the burgers! When everything is homemade, it definitely tastes better!
This is the first recipe I’ve made with poolish, and it was definitely worth it! Thanks for the delicious recipe.
This is so fun and delicious! My kids can’t wait to make it again!