No-bake Candy Cane Oreo Cake Pops


Are you looking for a quick no-bake dessert for the holidays? Then this fantastic candy cane Oreo cake pop is the perfect treat for you!
Imagine the combination of delicious Oreo cookies refined with crunchy candy cane bits and chocolate combined into a tasty dough.

An incredible thought, isn’t it? A taste that dances on your tongue, and when chewing small, snow crystal-like splinters dance in your mouth. Yes, this is Christmas, and the culinary composition of these extraordinary no-bake Oreo candy cane cake pops!
I’ve always wanted to make cake pops that combine soft like cake and crunchy like candy inside.
I finally succeeded with the combination of Oreo cookies and ground candy canes. And let me tell you, these cake pops went like hotcakes. So fast, I could not even look.
I had to make the next batch! And yes, it was partly my fault that they were gone so quickly! 😊
🥘 Ingredients
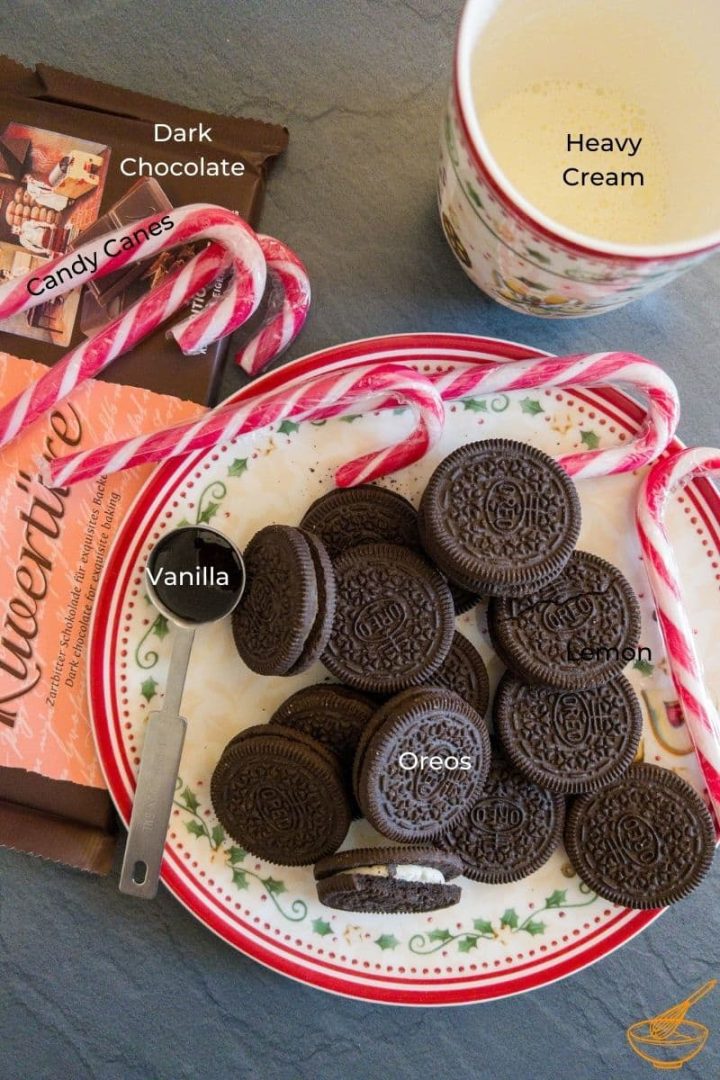
- Candy canes – or any hard candy of your choice.
- Oreos – any cream-filled cookies can work here
- Dark chocolate couverture – dark chocolate pairs very well with Oreos. If you opt for another cookie, make sure the chocolate complements the cookie well.
- Vanilla extract – You can also use ground vanilla instead of vanilla extract. For other cookies: gingerbread, caramel, and rum-essence would work nicely.
- Heavy whipping cream
Get your chocolate couverture at Prime Chocolate and save 10 % with the code ThankYouNora
🍽 Equipment
- Cake pop equipment
- Cake pop silicone mold
- Lollipop sticks (cake pop stick)
- Food processor
- Waterbath (or bain-marie)
- Medium size bowl
- Electric hand mixer
- Tablespoon or cookie scoop
🔪 Instructions
Before you begin, prepare a water bath and start melting the chocolate. With the pre-arranged melting process, you’ll have liquid when needed.
Suppose you do not have a chocolate melter at hand (and few have that at home); you can manage easily with two different-sized pots. In the lower one, you fill the water you heat on the stove, and in the upper saucepan, you put the chocolate you want to melt.
The following preparation of these delicacies will get a bit noisy! Because crushing the candy canes in the food processor is loud. But only briefly. 😀 I say that to be on the safe side! (Suppose you have a baby at home and want to use your little darlings’ naptime to create this excellent cake pop.) In that case, this could lead to minor inconsistencies and a crying baby. So maybe better to make it at a time when the noise can wake no one up.
After grinding the candy canes, take one tablespoon of the crushed candy and set them aside. You will need this tablespoon of crushed candy canes to decorate your cake pops as a finishing touch.

Before it quiets down again, add the Oreo cookies to the candy cane crystals and crush them with your food processor. A lot of noise! But now it will get quieter again. Promised!
Since you’ve wisely melted the chocolate, you can use it right away.
First, empty the cookie candy cane crumbs into a mixing bowl and add the vanilla extract and half of the melted chocolate.
But only half of the chocolate! You’ll need the rest of the melted chocolate later to coat the cake pops! So please don’t add the entire chocolate to the cookie and candy cane crumbs! That would be a shame!
Now mix the ingredients well together. You can do this with the wooden spoon just as well as with the electric hand mixer. It works both ways. The more homogeneous result you get obviously with the electric hand mixer. Add the heavy whipping cream and mix well again.
To make pouring the mixture into the cake pop molds easier, chill it in the refrigerator for 15 minutes (helps tremendously)!
Layout your cake pop mold base (the one without the hole) on the countertop and place the mixture into the mold. You can do this easily with a tablespoon or use a cookie scoop for this endeavor. Whatever you have of the two at hand.
Spreading the batter evenly between the molds is much easier with the cookie scoop. But as you can see in my video, you can do it reasonably well without it.
Once you have all the truffle batter “evenly” distributed between the molds, place the silicone mold’s top (the part with the holes).
Now only the cake pop sticks are missing. Put the lollipop sticks into the tiny holes, one after the other, and make sure that you put them in far enough so that the cake balls won’t break off so easily later.
Place the filled silicone container for 30-60 minutes in the freezer.

TIP: You can quickly tell if the cake pops are firm enough to be removed from the silicon mold. Carefully try to lift the silicone top. It will be fine if the stick is fixed and does not move. If it is still wobbly, it is better to put it back in the freezer to avoid a nasty surprise.
Once hardened, we come to the last part of the development. Remove the solid balls from the mold, and dip them in the remaining melted chocolate.
Let the excess chocolate drip off, and press the top of the dough ball into the candy cane crystals you set aside earlier. Set the finished cake pops aside to solidify. You can easily use a glass jar for this. But of course, there are also dedicated cake pop stands. Whatever you have, so these delicacies can become solid and won’t fall over.
Let your cake pops set in the refrigerator before eating. Then it’s done! Your beautiful and delicious Oreo candy cane cake pops are ready! Enjoy!

🌡️ Storage
Store the cake pops in the refrigerator. They will last a few days there without any problems. You can also freeze these cake pops for up to two months. Just put them in the fridge to thaw, and you’ll have a scrumptious dessert on hand hours later.
💭 Top tip
If you don’t have a silicone cake pop mold at hand and don’t want to buy one, you can make small truffles from the above-described batter.
Prepare a pre-cooled base after chilling the mixture in the refrigerator for 15 minutes. (This can be a silicone mat, which you cool in advance in the fridge, but also a cooled baking tray.) Cut teaspoon-sized pieces from the chilled truffle mixture and quickly roll them into balls. I recommend using gloves here! Now dip one hand into the melted chocolate and roll the truffle ball in the “chocolate hands,” coating the Oreo candy cane ball with chocolate.
Place the chocolate-covered Oreo ball on the cooled surface and sprinkle it with the candy cane crystals. Then (as with the cake pops), let them solidify in the refrigerator and store them in an airtight container.

now available!
My new workbook is here!
Brewing Coffee for Milk Drinks
How to adapt your favorite brews for milk & creamers — without an espresso machine!
If you make this recipe, let me know how you liked it by ★★★★★ star rating it and leaving a comment below. This would be awesome! You can also sign up for our Newsletter or follow me on Pinterest or Instagram and share your creation with me. Just tag me @combinegoodflavors and hashtag #combinegoodflavors, so I don’t miss it.
No-bake Candy Cane Oreo Cake Pops

Equipment
- Cake pop sticks
Ingredients
- 5 pieces Candy canes or any hard candy of your choice
- 14 Oreo cookies or any cream-filled cookie
- 5.3 oz Dark chocolate couverture
- 1 tsp Vanilla extract
- 2 ¾ tbsp Heavy whipping cream
Instructions
- Prepare a water bath and start melting 5.3 oz Dark chocolate couverture.5.3 oz Dark chocolate couverture
- Crush 5 pieces Candy canes in the food processor.5 pieces Candy canes
- Take one tablespoon of the crushed candy and set them aside.
- Add 14 Oreo cookies to the candy cane crystals and crush them together with your food processor.14 Oreo cookies
- Empty the cookie candy cane crumbs into a mixing bowl.
- Add 1 tsp Vanilla extract and half of the melted chocolate.1 tsp Vanilla extract
- Mix the ingredients well together with the electric hand mixer.
- Add the 2 ¾ tbsp Heavy whipping cream and mix well again.2 ¾ tbsp Heavy whipping cream
- Chill the batter in the refrigerator for 15 minutes.
- Fill the batter into the molds and place the top part of the silicone molds. Insert the cake pop sticks.
- Freeze for 30-60 minutes.
- Remove the solid balls from the mold, and dip them in the remaining melted chocolate.
- Let the excess chocolate drip off and press the top of the balls into the candy cane crystals you set aside earlier.
- Set the finished cake pops aside to set.
- Let your cake pops set in the refrigerator before eating.
Nutrition
🤎 You might also like
⛑️ Food Safety
- Cook to a minimum temperature of 165 °F (74 °C)
- Do not use the same utensils on cooked food, that previously touched raw meat
- Wash hands after touching raw meat
- Don’t leave food sitting out at room temperature for extended periods
- Never leave cooking food unattended
- Use oils with high smoking point to avoid harmful compounds
- Always have good ventilation when using a gas stove
For further information, check Safe Food Handling – FDA.


Super delicious and easy to make. I put them in treat boxes for Christmas gifts. Thank you!
Thank you, Elizabeth! Great idea with the treat boxes! Love it!
These would be so much fun to make and to eat.
I am in full-on Christmas baking panic mode. I was looking for no-bake options to add to the holiday cookie gift trays. These were perfect! Thanks.